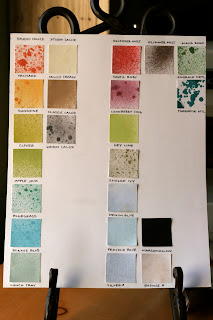
3. Adhered each colored square in a column by manufacturer to an 8.5 x 11 piece of card stock. I labeled each color by the manufacturer's name listed on each bottle of mist.
*I made sure to leave room for new additions to my color chart in the future. (One never knows when the misting stash might grow!) ;-)
4. I slipped my color chart into an 8.5 x 11 sheet protector and placed it in a three ring binder I have for sketches, etc. and now it's ready to go for easy reference!
Another idea: Cut up your 8.5 x 11 paper into strips and make "paint sample" strips of the square color samples. Punch a hole in the top end of each strip. Align each strip of color samples with each punched hole and place a metal binding ring (you can purchase at Hobby Lobby or Michael's) through the stacked strips. Flip to the manufacturer or color you are looking for, and you are good to go!
Here's a pic of how I organize and store my mists. This organizer/tool caddy is a little something I picked up a few years back from Hobby Lobby. It has a handle and sits just inside the door of my walk-in closet where most of my scrapbook supplies are. I like that they are near-by and easily accessible.
Oh, I almost forgot! One other thing! Some mists do not show up well on white card stock. (One of the reasons I wanted to make up a color chart to begin with). For example, the Marshmallow Mist Tattered Angels Glimmer Mist is difficult to see on white card stock (no contrast). So, I punched out a black square and misted the Marshmallow Mist onto it for better visibility of the color. Silver mist was also difficult to see on both black and white. So, it ended up being sprayed on a light blue piece of card stock.
Hope you found this helpful! Happy misting!


LOL!!! I wish I had this problem! hee hee! I only have one bottle! Great idea...x
ReplyDelete